Wednesday, February 27, 2013

Excel and Applique

 I love doing things the easy way and if you have a large image that needs to be printed so you can applique it, this is the easiest.

At home, I have PhotoShop and other heavy duty photo manipulating programs that can do everything from enlarging a picture to buying me candy on Valentine's Day... and sometimes that's just a little much. At work, I don't have all of those and that turned out to be a good thing because I found the simplest way to print appliques ever.

My office computer has Windows and runs Excel 2007. At home I have Macs that run Excel 2011 and the principles are all generally the same. In about two minutes, I can resize and print out any image I purchase and want to applique.

On the Excel tabs, click insert, then picture, and find the file you want to use.

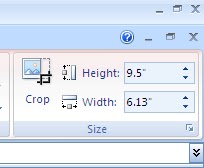
Once it's inserted, look at the box on the top right and tell it the size you want. Some programs ask about pixel size and I never, ever know the right number of pixels without opening Photoshop, creating something with the right measurements, using the ruler to calculate pixels, etc.; and since that's not the easy way, I like that Excel will let you deal solely with inches.

Excel will also keep the image proportional. I know that I want to use this image on a 10" block, so I set the largest number at 9.5" and Excel does the rest.


But, the best part is that if you have an image that will not fit on one page, Excel will automatically print the picture as a poster and you will just need to tape the sheets together. No other manipulation needed. I have printed out images up to 40"X 40" - and this is the simplest program I've used and it's on just about every computer around. Just one word of preemptive caution if you are printing out something that large, you may want to go to the "page setup" menu and tell it to number the pages as they are printed so you can keep them straight.


Oh, and as always when you are tracing a picture with fusible webbing, the applique will be facing the opposite direction than the picture you started out with, so keep that in mind.

Hopefully someone will get some use out of this :-)

Thanks, and happy quilting.

Monday, February 11, 2013

Lazy, Lazy Circles

I love circles. And, even more than I love circles, I love trapunto circles. I've seen a lot of tutorials on the internet about circle making, but none about the way I do them. That certainly doesn't mean they're not out there, just that I haven't seen them; so, I'm posting my own little recipe.

 I like taking the easy way. (My coworker says that it's because I'm a lazy American... but as soon as I put down my Taco Bell and Cheetos, I gave him a piece of my mind.) So, I like using self adhesive things whenever possible. Adhesive batting comes in very handy for these circles because the bond is sturdy but low enough tack that it's adjustable if a mistake is made, not that I make mistakes (more than once every five minutes, anyway). I cut templates out of poster board and use them to trace the shapes onto the batting and then cut out the circles.

 I cut the fabric to where it's at least 3/4" bigger than the batting, so there will be enough surface area for the adhesive to grab onto when I fold it over.


Then flip the fabric and template over and use a very hot iron to activate the adhesive and as much pressure as I think the table can stand to make it stick to the fabric. The only thing to be careful of here is that if the bottom of the batting also heats up, it will stick to your ironing pad. It's not a disaster if that happens because the tack is low enough that it will peel off, but you don't want do that too many times and have excessive residue left on your ironing pad; that could cause issues on future projects.


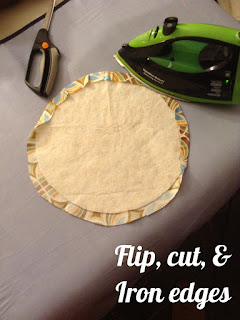
Flip the circle back over and cut around the edges, I leave a good deal of fabric so I can iron without touching the batting - gummy irons are a bad thing - and so there is enough fabric to be grabbed by the adhesive. The cuts don't have to be even or pretty, they will be buried and never ever seen again, so don't sweat perfection here. Speaking of sweating, I burn my fingers during this part - at least once for every four circles... but you are all probably more graceful than I am.

This works well for larger circles and they hold in place until it's time to applique them to the quilt top. But, smaller circles take one extra step.


I always have to tack the fabric to smaller circles before I iron them; otherwise I end up with malformed hexi-octi- or whatever - gons. These stitches can be as long or short as you need them to be, because as soon as the edges are ironed down, you rip them out anyway, so the longer the better.


The really bad thing though, is doing all this work and then questioning your color choices. I laid these out in the configuration I wanted and was less than enthused, but it's growing on me. I'll show the finished quilt in a February round up post at the end of the month.


Wednesday, February 6, 2013

First thread painting attempt

When someone tells me, "You can't mess this up," I take it as a challenge, because I can make a mess of anything. I've purchased a thread painting class on Craftsy, but haven't had time to sit down and watch it - instead, I've seen a couple of two or three minute long tutorials on youtube and every one of the instructors has used the above phrase.

When I was eight years old (approx.), something schoolwork related came up and my mother showed me how to draw a chicken. I don't remember what her chicken looked like, I just remember my dad howling with laughter and my mother swearing to never draw anything again. We laugh about it now, but I know she was pretty embarrassed (and angry) at the time.To the best of my knowledge, my mother has never even doodled since then. I inherited my drawing abilities from her. I couldn't draw my way out of a paper bag... actually, I couldn't even draw a paper bag... so the thought of painting with thread terrified me. But, I decided to give it a shot.


Not wanting to start from anywhere even in the proximity of scratch, I found a picture of the fossil I wanted for an applique and printed it on self-sticking, water soluble stabilizer. I slapped it on fossilish colored material, hooked up my free-motion foot and hoped for the best.
I outlined the dark areas with my darkest brown thread and scribbled in some of the larger dark patches.


Then I used a different shade of brown to scribble in the rest of the shading.

And here's where things got tense. I have never been terribly good at appliqueing circles this way and this shape has an indentation and a corner. I stitched more stabilizer onto the front of the shape, tracing just outside the image, then cut off the excess, leaving about an 1/8th of an inch past the stitch. Then I cut a slit in the stabilizer and turned the whole thing inside out... Leaving the stitched applique on the front and then I just stitched it to the background fabric and ran the whole thing under warm water until the stabilizer disappeared.My first venture into thread painting wasn't a howling success; but it was definitely good enough that I am a lot less scared to draw with thread on my next project.