Showing posts with label applique. Show all posts

Friday, January 16, 2015

Valentine's Day Patterns


I go through long stretches where I just don't feel like sewing - then, I get the bug and can't stop. Since moving to a tiny (I can't emphasize that word enough) apartment in Salem, I haven't really had the wherewithal to work on much, even though fully half of my new living space is set up for quilting. But, as with most things, once I force myself to sit down and work on something, I can't stop until it's finished.

Valentine's Day is coming up and I wanted to get a few new patterns out there and ready to go and since I am the animal applique king (self proclaimed), I went straight for the applique and decided to make these two quilts...


I found the images of the animals and they just screamed out to be immortalized. I was a little hesitant to put a skunk on a quilt until I remembered this picture of me as a 1 year old...

Me @ 1 year old

 And I figured that if my mother could dress me in skunks, it would be fine for a quilt. And, if I do say so myself, they came out very well. I've finished the tops of both (and got rid of some of that "Love" fabric that's been haunting me since a certain post-Valentine's sale at my local fabric store 4 years ago - it seemed like a good idea at the time). Both of them will be completed this (thankfully, long) weekend.


And since my applique patterns don't sell as well as my pieced patterns, I also plan on having a pieced Valentine's pattern up by Tuesday. I'm only going to make the baby quilt as a sample, because that's all the floor space I have and I always bind on the floor - so much easier.

Wishing everyone a happy (and productive if you want it to be) weekend.
Baby Quilt w/ 6" blocks
Twin Quilt w/ 6" blocks

Sunday, September 14, 2014

New Project and Many Thanks

So, I haven't had a chance to sew recently - and it's starting to eat me up. I've been getting a lot of writing done - trying to maintain a 3,000 word a day word count. And, I just had to move and don't have a huge workroom solely dedicated to fabric and quilting... but, I know that most people don't have that, so I'll stop whining.


My boss has asked me to make her recently deceased mother's dress into a bed runner. As with any project that I don't think up myself, I'm frozen. I completely and totally overthink these things. Then after months of having complicated patterns running through my head, I end up doing something simple and it works out. It's time for me to do the simple thing and stop procrastinating. I'm thinking of just making stripes with the wool of the dress and an off-white cotton and then hand appliquéing the ornate pieces onto the off-white somehow.  If anyone has any ideas - I'd love to hear them.

Also, I would like to thank everyone who has purchased my simple little layer cake pattern! I now have the third highest selling quilt pattern on Craftsy! At $2 a pop, it's raking in much more pride and gratefulness than money - but there are times when satisfaction is more important than money. Thank you all so very much!


Monday, August 4, 2014

Tangled Up in Blues

I have always feared blues... not blues as in sadness, the actual color. Matching blues is all hard and stuff. There are so many different undertones and shades that finding complimentary blues is a headache. But, I decided to confront my fears and designed a throw that would incorporate five different blues.


I was getting ready to take a hand appliqué class at my local quilt shop, so I came up with this quilt and went in for fabric help. Usually I can stand in the doorway of a fabric shop, scan, and see exactly what I need (and then I buy an extra $100 worth... because obviously I'm going to need it later), but since blues were involved, I asked the nice ladies for help.

I should stop here and say that I've been in quilt shops that have treated me like dirt. Being a guy who quilts has given me a pretty good taste of what women have had to deal with when they take their cars to less than enlightened mechanics. However, the women at Cambridge Quilt Shop have always been wonderful.

I found five great blues and a very black black for the appliqué. Then the appliqué class was canceled because I was the only one who signed up. I could have just learned it from youtube but I was annoyed enough that I just set the project aside for a while (read that as "about a year").

By the time I got back around to it, I had already made a few patterns to sell and realized that the 32 pages it would take to make the appliqué pattern probably wouldn't fly. I also realized that a bed quilt pattern would sell better than a throw, so I ditched part of my original design and increased the size to make it a double quilt.


Since I bought quite a few cones of white thread at my last quilt show, I went ahead and did heavy quilting in all of the white areas. And, apparently my recent aversion to borders also applies to bindings because the only way I could see this was with a white binding. I didn't want the pattern to be blocked in, but to look like it goes on and on.


Tuesday, January 21, 2014

Over-run By Animals


I think I am quilting too many animals lately, but I've realized that selling quilts is not a viable business model. I'm sure anyone out there could have told me... if I'd bothered to ask. So instead of selling quilts, I'm trying to sell more patterns. Most of us can look at a quilt, immediately see the structure, and sit down with a piece of graph paper and know how to replicate it in about a minute and a half. Because of this... I'm sticking pretty close to the animals. They are harder to replicate and I know that if I wanted a baby quilt, I'd be willing to pay a few bucks for someone else to have done the initial legwork. So, for now, I am vying to be King of Animal Applique.

Also, I am taking my first class this week. I've been quilting off and on for 13 years and have never had a reason and the opportunity to take a class right when I need it. Usually, I have to learn how to do something on the fly and need the information as quickly as I can get it so I find the information on the internet or in a book. But, when I came up with this design...

and decided that I wanted to use hand applique on it, I realized I've never actually gotten around to learning how to do that. On Thursday (impending snow storm willing), I'm going to go sit down with an actual teacher and learn how. This way, someone can hear me when I whine, "But, I just don't get it." Look out, Cambridge Quilt Shop. Assuming I can slog through the snow, I'll see you ladies on Thursday.


Tuesday, November 19, 2013

New Owl Pattern!

I had done this quilt twice, both times in lavenders, so when someone else ordered it, I begged her to choose another color, and I think it came out great. It's a 60" x 80" throw (because oddly enough, I had more requests for this as a throw from adults than I did for a baby quilt). It lists material quantities needed, construction instructions, applique templates, and a link to the applique tutorial on my website... tutorial - because there are as many applique methods in the world as there are quilters, so I thought I'd throw mine out there. The pattern is available in my Craftsy store. (link to pattern) And I will have the pattern up for a 40"x60" baby quilt soon.


Thursday, October 24, 2013

My First Quilt Pattern! (updated)

I had over 150 people download this pattern and there were no complaints, so I'm moving ahead with more patterns. If anyone has any questions about anything in one of my patterns, please feel free to email, or even call, me.

Here's the link to the webpage----> codmansquarecreations
The PDF for this adorable 40"X60" crib quilt.


Wednesday, February 27, 2013

Excel and Applique

 I love doing things the easy way and if you have a large image that needs to be printed so you can applique it, this is the easiest.

At home, I have PhotoShop and other heavy duty photo manipulating programs that can do everything from enlarging a picture to buying me candy on Valentine's Day... and sometimes that's just a little much. At work, I don't have all of those and that turned out to be a good thing because I found the simplest way to print appliques ever.

My office computer has Windows and runs Excel 2007. At home I have Macs that run Excel 2011 and the principles are all generally the same. In about two minutes, I can resize and print out any image I purchase and want to applique.

On the Excel tabs, click insert, then picture, and find the file you want to use.

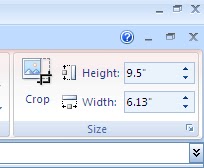
Once it's inserted, look at the box on the top right and tell it the size you want. Some programs ask about pixel size and I never, ever know the right number of pixels without opening Photoshop, creating something with the right measurements, using the ruler to calculate pixels, etc.; and since that's not the easy way, I like that Excel will let you deal solely with inches.

Excel will also keep the image proportional. I know that I want to use this image on a 10" block, so I set the largest number at 9.5" and Excel does the rest.


But, the best part is that if you have an image that will not fit on one page, Excel will automatically print the picture as a poster and you will just need to tape the sheets together. No other manipulation needed. I have printed out images up to 40"X 40" - and this is the simplest program I've used and it's on just about every computer around. Just one word of preemptive caution if you are printing out something that large, you may want to go to the "page setup" menu and tell it to number the pages as they are printed so you can keep them straight.


Oh, and as always when you are tracing a picture with fusible webbing, the applique will be facing the opposite direction than the picture you started out with, so keep that in mind.

Hopefully someone will get some use out of this :-)

Thanks, and happy quilting.

Monday, February 11, 2013

Lazy, Lazy Circles

I love circles. And, even more than I love circles, I love trapunto circles. I've seen a lot of tutorials on the internet about circle making, but none about the way I do them. That certainly doesn't mean they're not out there, just that I haven't seen them; so, I'm posting my own little recipe.

 I like taking the easy way. (My coworker says that it's because I'm a lazy American... but as soon as I put down my Taco Bell and Cheetos, I gave him a piece of my mind.) So, I like using self adhesive things whenever possible. Adhesive batting comes in very handy for these circles because the bond is sturdy but low enough tack that it's adjustable if a mistake is made, not that I make mistakes (more than once every five minutes, anyway). I cut templates out of poster board and use them to trace the shapes onto the batting and then cut out the circles.

 I cut the fabric to where it's at least 3/4" bigger than the batting, so there will be enough surface area for the adhesive to grab onto when I fold it over.


Then flip the fabric and template over and use a very hot iron to activate the adhesive and as much pressure as I think the table can stand to make it stick to the fabric. The only thing to be careful of here is that if the bottom of the batting also heats up, it will stick to your ironing pad. It's not a disaster if that happens because the tack is low enough that it will peel off, but you don't want do that too many times and have excessive residue left on your ironing pad; that could cause issues on future projects.
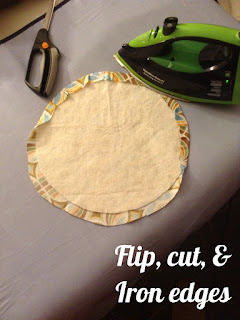


Flip the circle back over and cut around the edges, I leave a good deal of fabric so I can iron without touching the batting - gummy irons are a bad thing - and so there is enough fabric to be grabbed by the adhesive. The cuts don't have to be even or pretty, they will be buried and never ever seen again, so don't sweat perfection here. Speaking of sweating, I burn my fingers during this part - at least once for every four circles... but you are all probably more graceful than I am.

This works well for larger circles and they hold in place until it's time to applique them to the quilt top. But, smaller circles take one extra step.


I always have to tack the fabric to smaller circles before I iron them; otherwise I end up with malformed hexi-octi- or whatever - gons. These stitches can be as long or short as you need them to be, because as soon as the edges are ironed down, you rip them out anyway, so the longer the better.


The really bad thing though, is doing all this work and then questioning your color choices. I laid these out in the configuration I wanted and was less than enthused, but it's growing on me. I'll show the finished quilt in a February round up post at the end of the month.