
At home, I have PhotoShop and other heavy duty photo manipulating programs that can do everything from enlarging a picture to buying me candy on Valentine's Day... and sometimes that's just a little much. At work, I don't have all of those and that turned out to be a good thing because I found the simplest way to print appliques ever.
My office computer has Windows and runs Excel 2007. At home I have Macs that run Excel 2011 and the principles are all generally the same. In about two minutes, I can resize and print out any image I purchase and want to applique.
On the Excel tabs, click insert, then picture, and find the file you want to use.

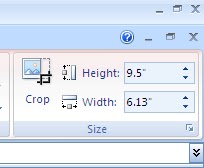
Once it's inserted, look at the box on the top right and tell it the size you want. Some programs ask about pixel size and I never, ever know the right number of pixels without opening Photoshop, creating something with the right measurements, using the ruler to calculate pixels, etc.; and since that's not the easy way, I like that Excel will let you deal solely with inches.

Excel will also keep the image proportional. I know that I want to use this image on a 10" block, so I set the largest number at 9.5" and Excel does the rest.
But, the best part is that if you have an image that will not fit on one page, Excel will automatically print the picture as a poster and you will just need to tape the sheets together. No other manipulation needed. I have printed out images up to 40"X 40" - and this is the simplest program I've used and it's on just about every computer around. Just one word of preemptive caution if you are printing out something that large, you may want to go to the "page setup" menu and tell it to number the pages as they are printed so you can keep them straight.

Oh, and as always when you are tracing a picture with fusible webbing, the applique will be facing the opposite direction than the picture you started out with, so keep that in mind.
Hopefully someone will get some use out of this :-)
Thanks, and happy quilting.
Hey - I love this technique~so fast! Here's a quilt I made with it http://waterpenny.net/columbus-ohio-heart-explosion-quilt/
ReplyDeleteThank you! I was starting to think that I was just typing in the wind - you have no idea how glad I am that you were able to use this! :-)
Delete